Simplify Your Azure AD B2C User Management
Managing Azure AD B2C users doesn’t have to be complicated. I've created an online or on prem service to manage Azure AD B2C users. With Attribute Editor, you get an intuitive, powerful tool to handle custom user attributes effortlessly.
Learn More or Contact Me for assistance with your Azure AD B2C project.
This post is about how to add custom role claims to an Azure B2C user flow access token without a custom policy. Azure B2C comes with a standard set of built-in attributes like City, Display Name and Street Address but you also have the ability to add your own custom attributes. When configured as application claims these attributes can be returned to the calling application via the access token after the user has authenticated.
Unfortunately, B2C does not have a built in attribute for roles or role based security. There is the ability to add roles as claims using custom policies as well, but this post is about how to add a custom role claim to an Azure B2C user flow access token without the need for a custom policy.
Add a custom attribute
First thing you need to do is create a custom attribute and add it to the application claims in your sign in user flow.
- Go to your Azure AD B2C tenant
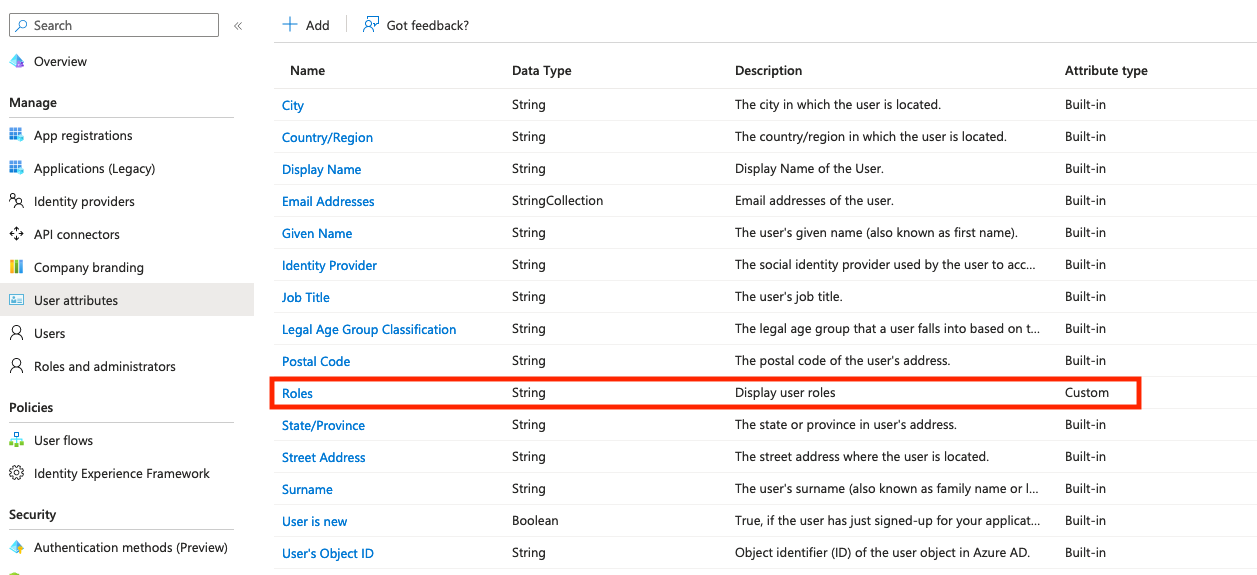
- Under Manage, select User attributes then Add
- Give your attribute the name Roles and a description. Then click Create.

Add the new Roles attribute to application claims
In this step you add the newly created Roles attribute to the application claims that are returned in the access token. The access token is created and returned to the calling application after the user has been successfully authenticated. This is assuming you already have a Sign in user flow created. If you do not have a Sign in user flow created then go here to create the user flow.
- Under Policies, select User flows then your Sign in User flow
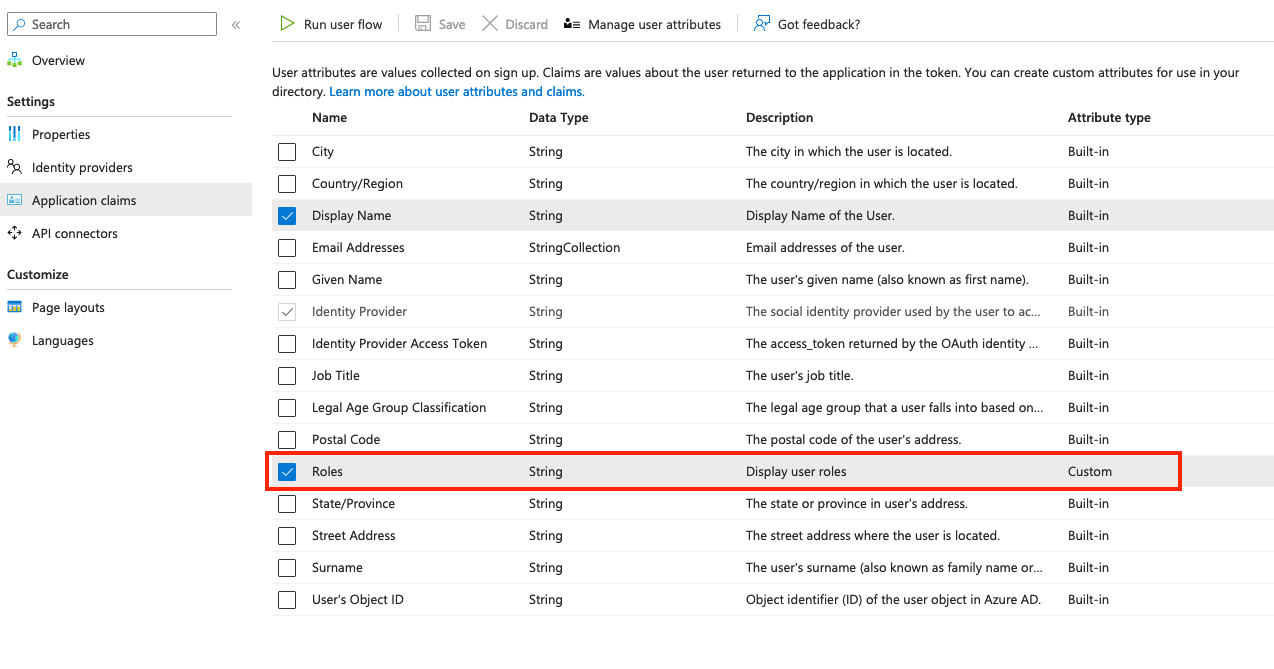
- Under Settings, select Application claims
- These are the different claims that are returned via the access code after the user has authenticated. You can select whatever claims here that are available, but select the Roles claim if nothing else.
- After you check the boxes next to the claims you want returned, click Save.

Populate Roles claim with the Graph API
Unfortunately, there is no way to update a B2C custom claim in the Azure portal, you'll need to populate the value via the Graph API. Follow this blog post if you do not already have a working implementation of the Graph API.
To set the new Roles claim value for a user, send a PATCH request to the https://graph.microsoft.com/v1.0/users/{{user id}} endpoint with the value for new Roles extension. The user id property is also referred to as the ObjectId of the user.
The the format of custom attributes, which are also referred to as extensions, is as follows: “extension_{{B2C Extension App Id}}_{Name of the extension}”. The value for B2C Extension App Id refers to the special app that is automatically registered within your B2C tenant to keep track of all the attributes. To find the B2C Extenstion App Id follow these steps:
- In your B2C tenant under Manage select App registrations
- Select All applications
- Not there will be an application named b2c-extensions-app. Do not modify. Used by AADB2C for storing user data.
- Copy the Application (client) ID and use it in the PATCH request.
Here is an example of what the request should look like. Here I'm setting the value of Roles to Admin.

View the new role claim in the access token
The final step is to run the User flow to see your new Roles claim in the returned access token.
- Go to your B2C tenant and select User flows under Policies.
- Select the Sign in User flow and run. My user flow has the return url value of https://jwt.ms to decode the access token.
- After you have successfully authenticated and viewed the access token you should now see the newly created role claim extension_Roles with the value of Admin. All extension attributes start with extension_ as default.
- Keep in mind that custom attribute extensions do not show up as Application claims for users who have not had the value applied to their account. Running the user flow with a user who has not had the extension_Roles value applied will return an access token that does not contain extension_Roles claim.

Now you can inspect the access token in your app to check the user roles.