Simplify Your Azure AD B2C User Management
Managing Azure AD B2C users doesn’t have to be complicated. I've created an online or on prem service to manage Azure AD B2C users. With Attribute Editor, you get an intuitive, powerful tool to handle custom user attributes effortlessly.
Learn More or Contact Me for assistance with your Azure AD B2C project.
As more and more companies move their applications to the cloud, managing user identities and access is a critical task. Azure Active Directory B2C is a cloud-based identity and access management solution that helps developers add identity and access management capabilities to their applications. However, querying and managing user data in Azure AD B2C can be a challenge. That's where the Microsoft Graph API comes in. In this blog post I’ll show you how to use Graph API to query Azure AD B2C users using Postman and return a list of users in your B2C tenant. By the end of this post, you'll have a good understanding of how to get started with Graph API to manage user data in Azure AD B2C.
Register new Graph API app
The first thing you need to do is sign into your Azure B2C tenant and create a new app registration for the Graph API app. Follow these steps to create a new Graph API app in your Azure environment.
- Switch to your B2C Tenant directory
- Go to Azure AD B2C
- Select App registrations in the Manage section
- Create a New registration
- Give your app a name. I named mine B2C Graph API. Click save and make a copy of the newly created Client Id.
- Click Certificates & secrets and create a New client secret. Give it a descriptive name and set the expiration date. I usually set mine to 6 months.
- Copy the Value of the newly created secret and hold on to it. Store the value in a secret vault or other safe place along with the client id from step 5.
- Click API Permissions. This is where you define what resources/access your Graph API will have access to. For this post I’m going to all the application to read and write all users. Click Add a permission, then Microsoft Graph, Application permissions and search for User.ReadWrite.All. Select the checkbox and click Add permission.
Get an access token
The next stop is to obtain an access token using the client credentials OAuth flow. Once an access token is created you’ll use that to authenticate your Graph API requests to return the user information.

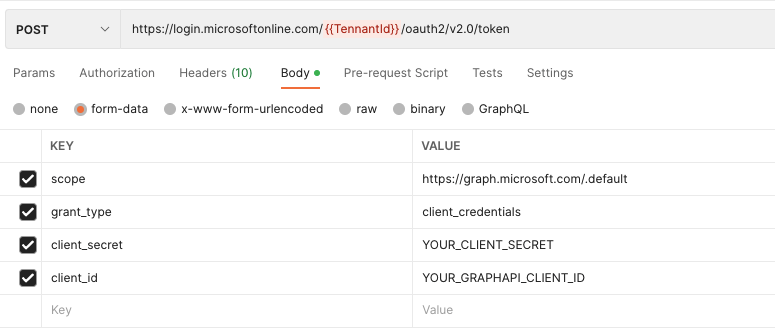
Open Postman and create a new POST request with the following parameters:Action: POST
Url: https://login.microsoftonline.com/{{TennantId}}/oauth2/v2.0/token where {{TenantId}} is the tenant id of your B2C Tennant
scope: https://graph.microsoft.com/.default
grant_type: client_credentials
client_secret: YOUR_CLIENT_SECRET
client_id: YOUR_GRAPHAPI_CLIENT_ID
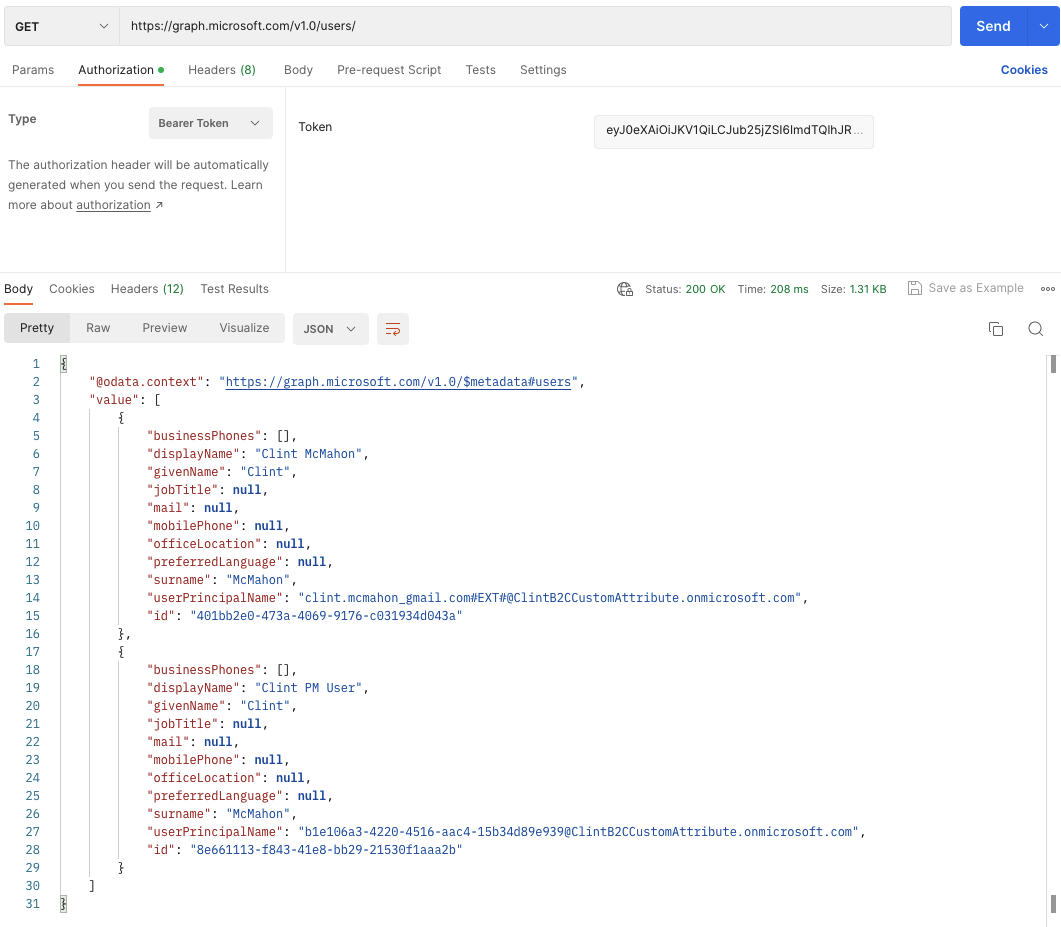
You should get a response that contains an access_token property. Copy the access token and open a new Postman tab. In the new tab enter the GET request URL equal to https://graph.microsoft.com/v1.0/users. Click the Authorization tab and select Bearer Token from the type drop down. Enter the access token you copied form the /token request and paste it into the text box for the Token. Your request should look like this:

Assuming it’s all set up correctly, after clicking Send you’ll get a response with a list of users who are part of your B2C tenant. From here you can append the Id to the URL and return the specific user details.

Related: Add role claims to an Azure B2C user flow access token